Creating a Partner
This guide explains how to create and invite new partners in JourneyBee.
Overview
Partners are companies or individuals you collaborate with to grow your business. JourneyBee supports two types of partners:
Referral Partners: Send you leads and earn commissions for successful referrals
Reseller Partners: Sell your products/services directly to customers
How to Create a Partner
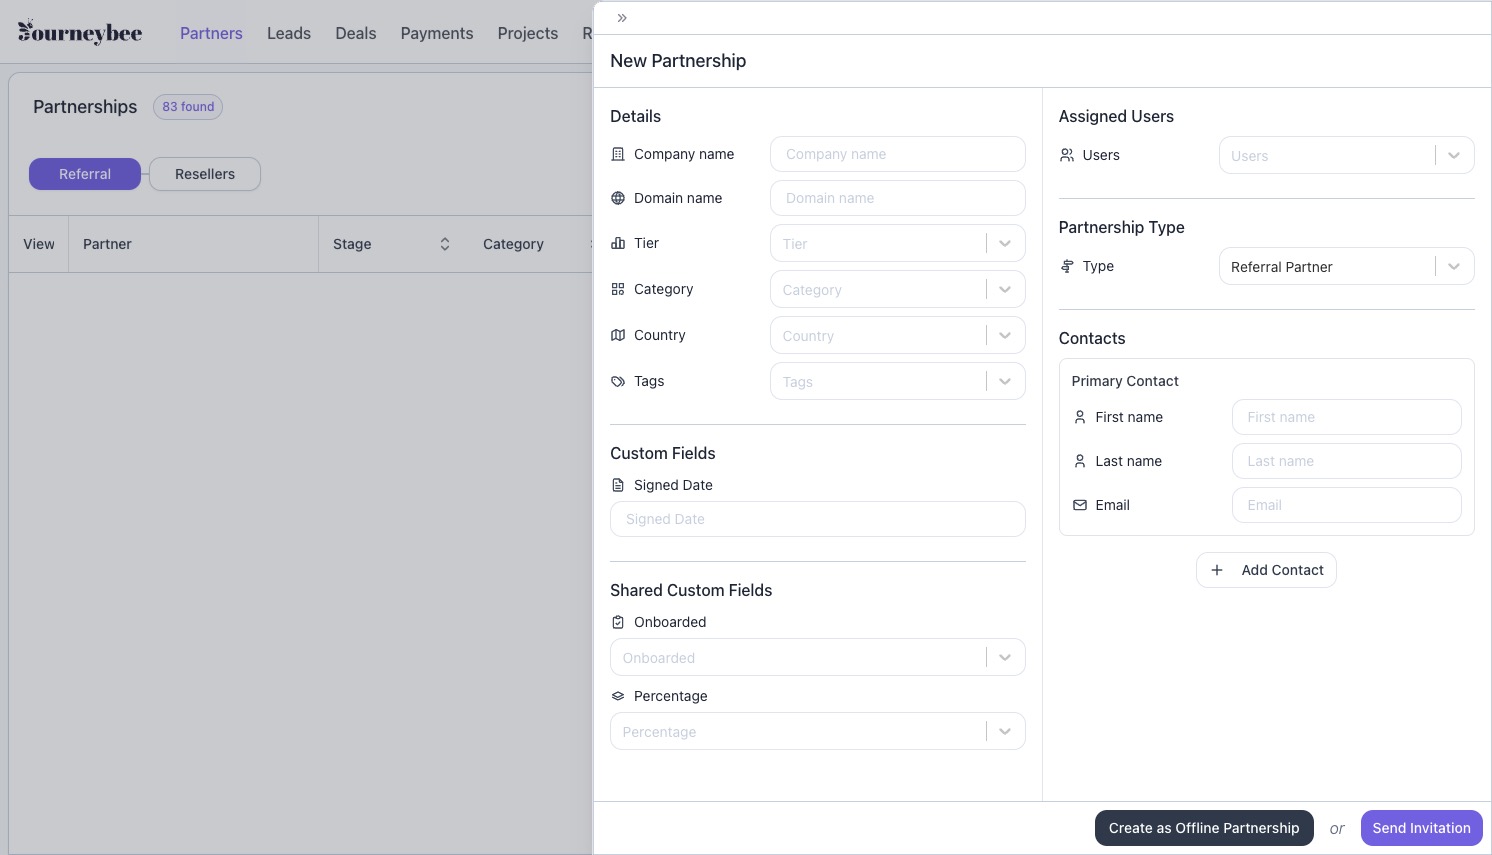
Step 1: Access the Partner Creation Form
Navigate to the Partners section in your JourneyBee dashboard
Click the "Add Partner" or "Invite Partner" button
The partner creation sidebar will open on the right side of your screen
Step 2: Enter Basic Partner Information
Company Details
Company Name (Required): Enter the partner's company name
Email Domain: Enter the partner company's email domain (e.g., "example.com")
Country: Select the partner's country location
Partner Classification
Tier: Choose an appropriate tier if you have tier-based partnerships
Category: Select a category that best describes this partner
Tags: Add relevant tags to help organize and filter partners
Partner Type:
Select Referral if they'll be sending you leads
Select Reseller if they'll be selling your products/services
For Reseller partners, specify whether commission flows to the partner or your company
Step 3: Assign Team Members
Assigned Users: Select team members who will manage this partnership
Multiple users can be assigned to a single partnership
Step 4: Add Partner Contacts
Primary Contact (Required)
First Name: Contact's first name
Last Name: Contact's last name
Email Address (Required): Valid email address for the primary contact
Tags: Add contact-specific tags if needed
Additional Contacts (Optional)
Click "Add Contact" to include more team members from the partner company
Each contact can have their own name, email, and tags
Use the "-" button to remove additional contacts if needed
Step 5: Custom Fields
If your organisation has configured custom fields for partners, complete any required information in the Custom Fields sections:
Standard Custom Fields: Fields specific to your organisation
Shared Custom Fields: Fields that both you and your partner can view and edit
Step 6: Send the Invitation
You have two options for creating the partnership:
Option 1: Send Invitation Email
Click the "Send Invitation" button
An email invitation will be sent to all contact email addresses
Partners can accept the invitation to activate the partnership
This creates an active partnership immediately
Option 2: Create Offline Partnership
Click "Create Offline Partnership"
Creates the partnership record without sending invitation emails
Useful for partners you've already connected with outside the platform
You can send the invitation later if needed
What Happens Next?
For Email Invitations:
Partner contacts receive invitation emails
They can click the invitation link to join JourneyBee
Once accepted, the partnership becomes active
Both companies can collaborate through the partner portal
For Offline Partnerships:
Partnership is created in "offline" status
Partner information is stored in your system
You can manage the partnership and track interactions
Invitation can be sent later when ready via the contacts tab on the partner portal
Important Requirements
Company Approval: Your company must be approved to invite partners
Valid Email Addresses: All contact emails must be valid and from the same domain
Unique Partnerships: You cannot create duplicate partnerships with the same company domain
Role Permissions: You must have admin or partnership management permissions
Tips for Success
Complete All Information: Fill out all available fields to maximise the value of your partnership data
Assign the Right Team Members: Choose users who will actively manage this relationship
Use Descriptive Tags: Tags help with filtering and organising your partner list
Double-Check Email Addresses: Incorrect emails will prevent successful invitations
Troubleshooting
Common Error Messages
"Invalid email address": Ensure all email addresses are properly formatted
"Company not approved": Contact support to get your company approved for partnerships
"Partnership already exists": You already have a partnership with this company
"Public email domain": Cannot create partnerships with generic email providers (Gmail, Yahoo, etc.) This feature is currently in development.
Need Help?
If you encounter issues creating partners, contact your system administrator or JourneyBee support for assistance.